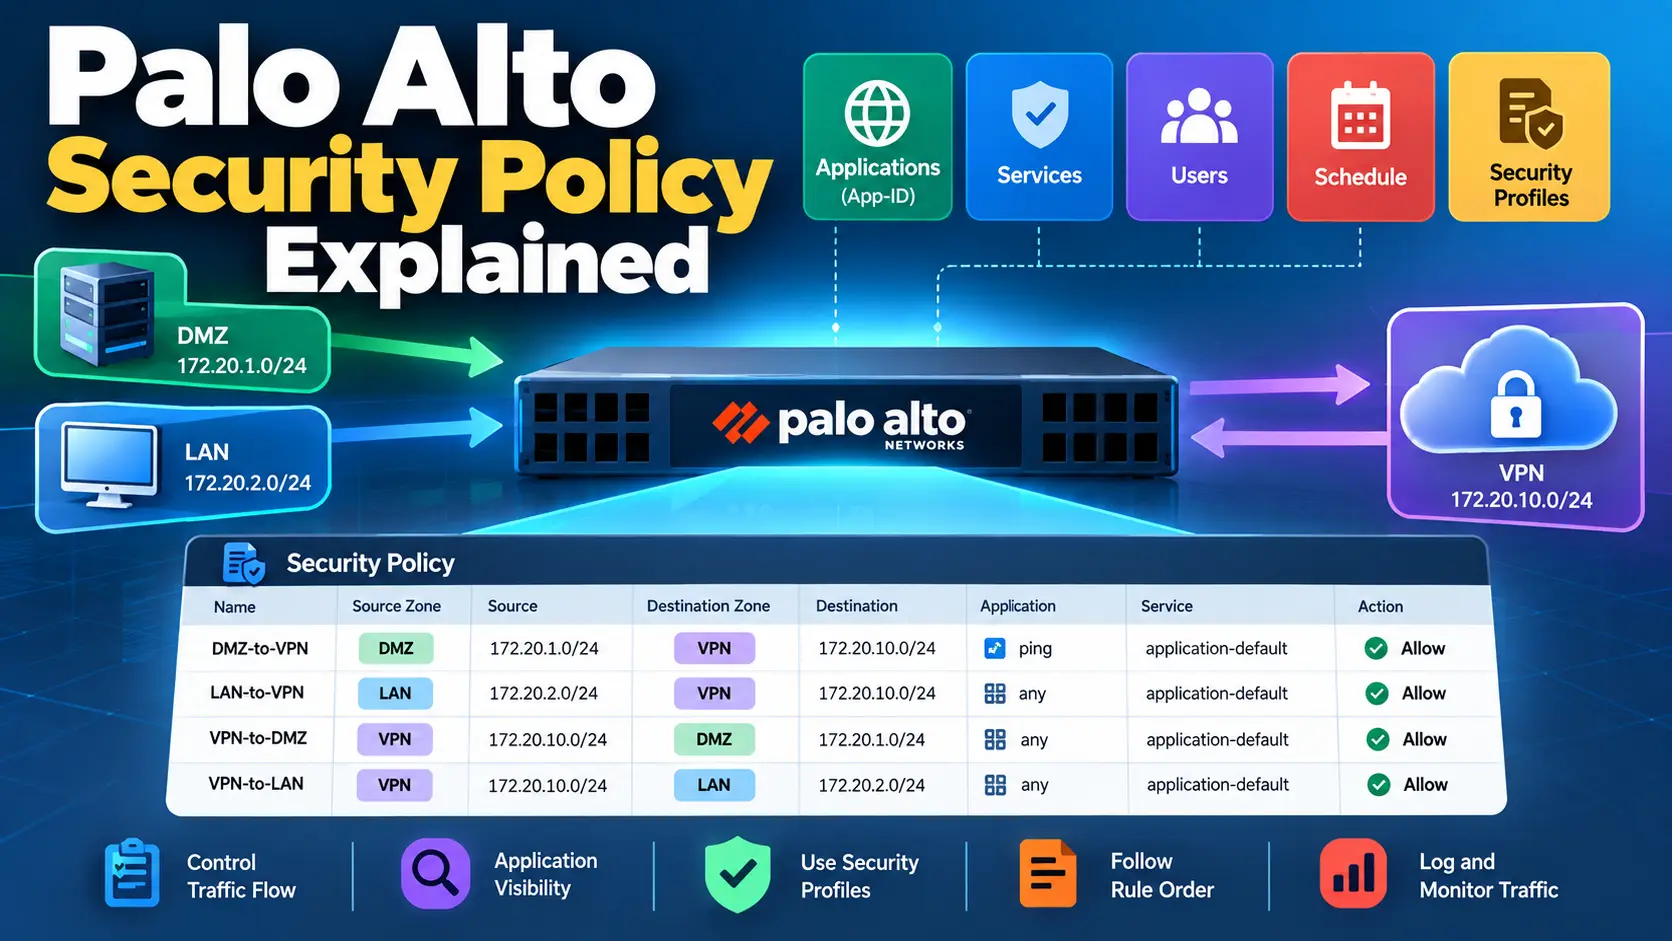
A Palo Alto firewall can have the correct interfaces, routing, NAT, and security profiles configured, but traffic can still be blocked because the Security Policy does not match the session.
This is one of the areas where Palo Alto is different from traditional port-based firewall thinking. A Security Policy can make a decision using the source and destination zones, IP addresses, users, applications, and services. Palo Alto uses App-ID to identify applications and lets you build policy around that application identity.
In this article, we’ll first understand how Palo Alto Security Policies work and then build a practical example using the EVE-NG Palo Alto lab from our previous IPsec VPN series.
What Is a Palo Alto Security Policy?
A Security Policy is a rule that tells the firewall what to do when traffic matches a particular set of conditions.
A rule can use criteria such as:
- Source Zone
- Source IP address
- Source User
- Destination Zone
- Destination IP address
- Application
- Service
- URL Category
- Schedule
- Security Profiles
The firewall then takes an action such as Allow, Deny, Drop, or Reset, depending on the rule configuration.
The important part is that all relevant match conditions need to be satisfied for the traffic to match the rule.
For example:
Source Zone:      LAN
Source Address:   172.20.2.0/24

Destination Zone: DMZ
Destination:      172.20.1.0/24

Application:      ping
Service:          application-default
Action:           Allow
This rule doesn’t simply mean “allow traffic from LAN.”
It means:
Allow traffic from the specified LAN source to the specified DMZ destination when the traffic is identified as the permitted application and matches the configured service conditions.
That difference becomes very important when troubleshooting.
How Palo Alto Evaluates a Security Policy
Let’s say a client sends traffic through the firewall.
The firewall needs to determine several things:
Source
  ↓
Source Zone
  ↓
Destination
  ↓
Destination Zone
  ↓
Application
  ↓
Service
  ↓
Security Policy
  ↓
Action
Palo Alto evaluates Security Policy rules from the top of the rulebase downward and uses the first rule that matches the session. Once a rule matches, subsequent rules aren’t evaluated for that session. (Palo Alto Networks TechDocs)
This is why rule order matters.
Imagine these rules:
Rule 1: Allow LAN → Server
Rule 2: Deny LAN → Any
Traffic going from the LAN to that server matches Rule 1 first.
If you move the deny rule above it:
Rule 1: Deny LAN → Any
Rule 2: Allow LAN → Server
the traffic is denied before it reaches Rule 2.
The configuration may look correct, but the order makes the difference.
My Palo Alto Lab
For the practical example, we’ll use the same EVE-NG lab from the IPsec VPN series.
The relevant networks are:
Site-1 DMZ
172.20.1.0/24
Gateway: 172.20.1.254

Site-1 LAN
172.20.2.0/24
Gateway: 172.20.2.254

Site-2 LAN
172.20.10.0/24
Gateway: 172.20.10.254
The important zones on Site-1 are:
DMZ
LAN
VPN
And Site-2 has:
LAN
VPN
We’ll use the lab to create a simple policy allowing DMZ traffic to the VPN, then tighten the rule by specifying addresses and applications.
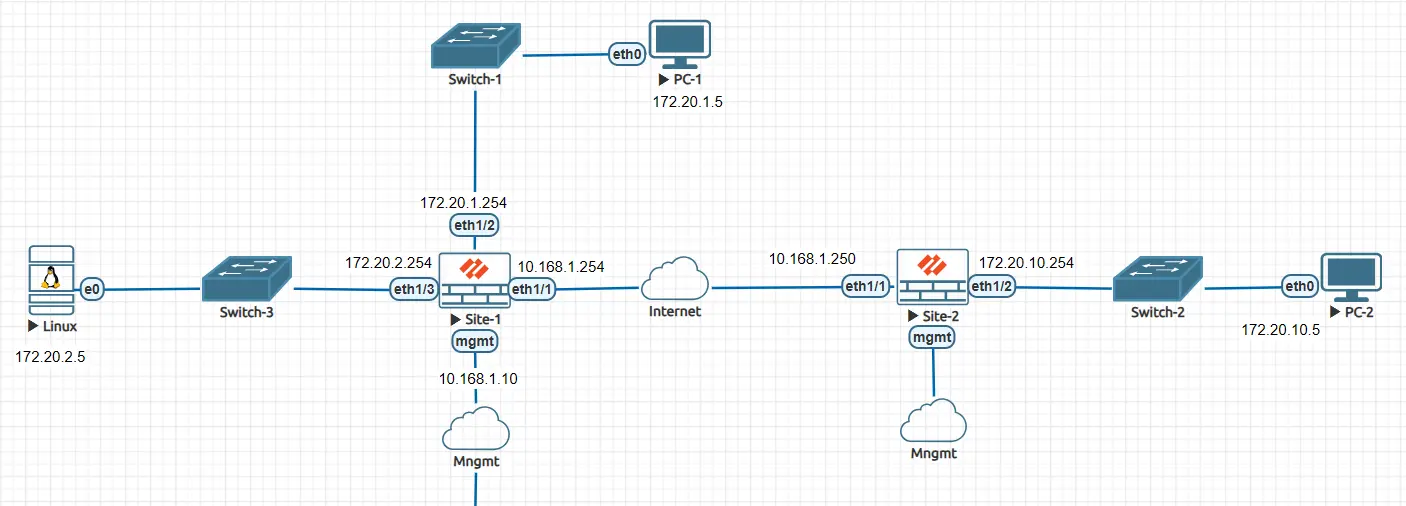
This is useful because the reader can refer back to the topology while following the policy examples.
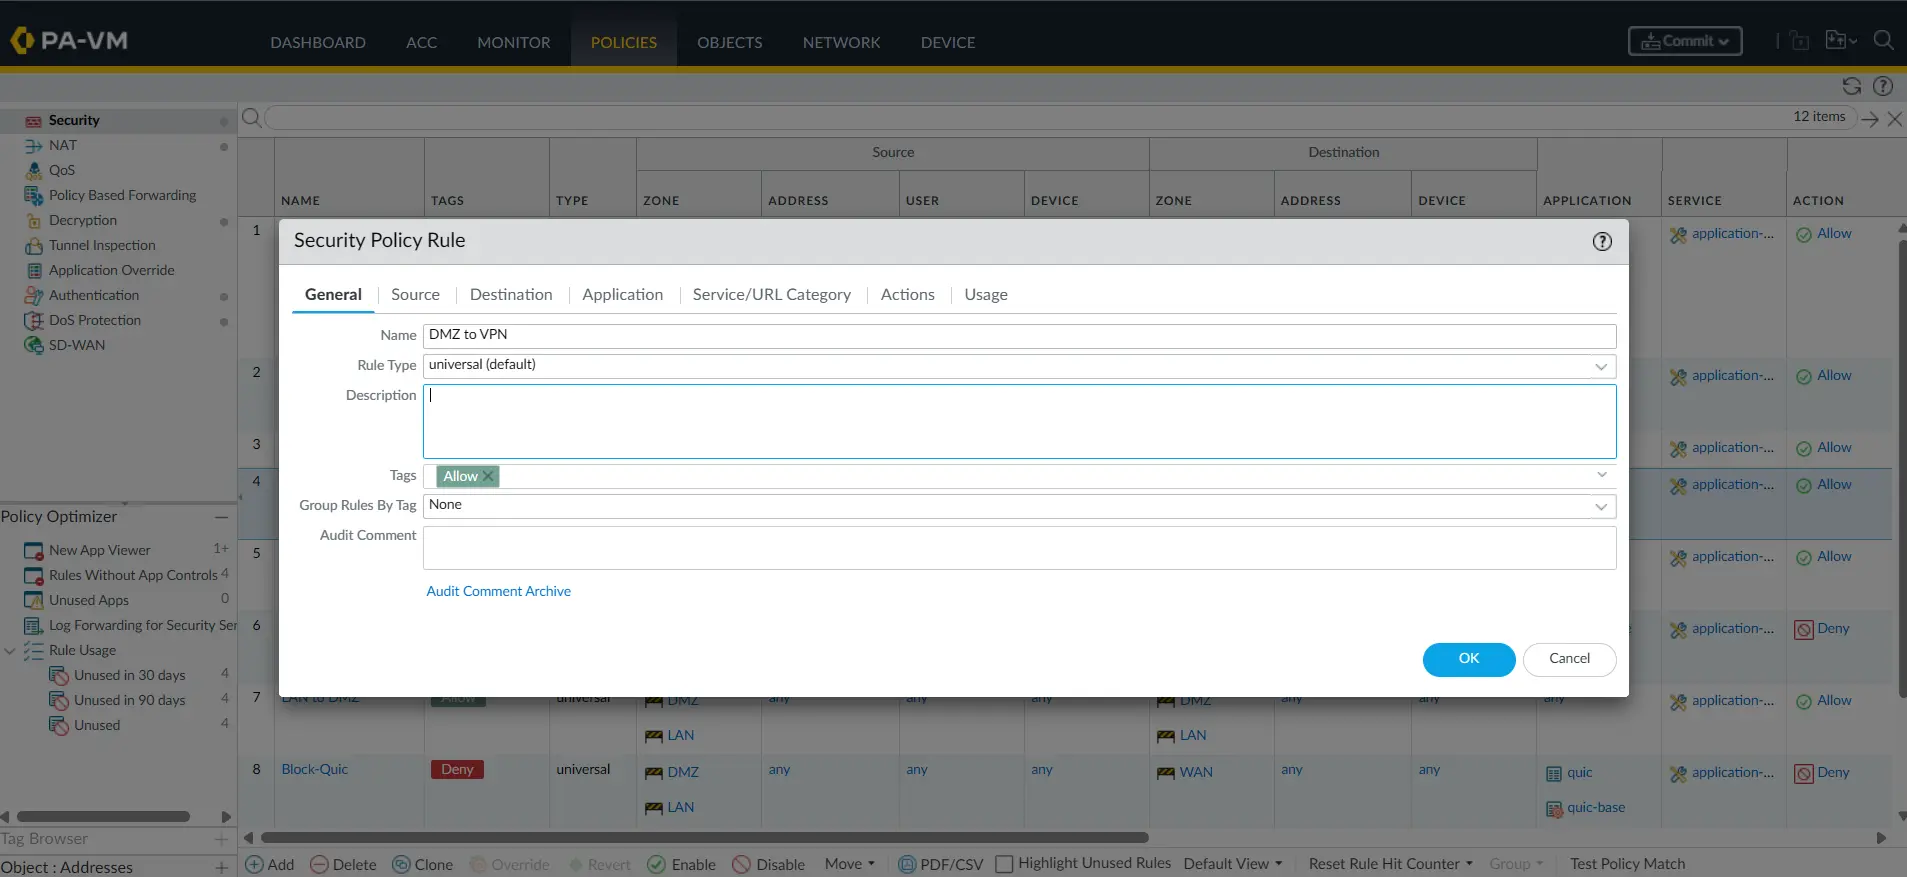
Step 1: Create a Security Policy
On the Palo Alto firewall, go to:
Policies → Security → Add
Give the rule a meaningful name.
For example:
Name: DMZ-to-VPNDon’t use names such as:
Rule1
Test
Allow
New Rule
Those names might make sense when you’re testing, but they become difficult to understand when the firewall has dozens or hundreds of rules.
A better name describes the purpose:
DMZ-to-VPN
LAN-to-VPN
VPN-to-DMZ
VPN-to-LAN
LAN-to-Internet
You can also add a description explaining why the rule exists.
Palo Alto supports descriptions, tags, schedules, and other rule metadata to make policy management easier.
Step 2: Configure the Source Zone
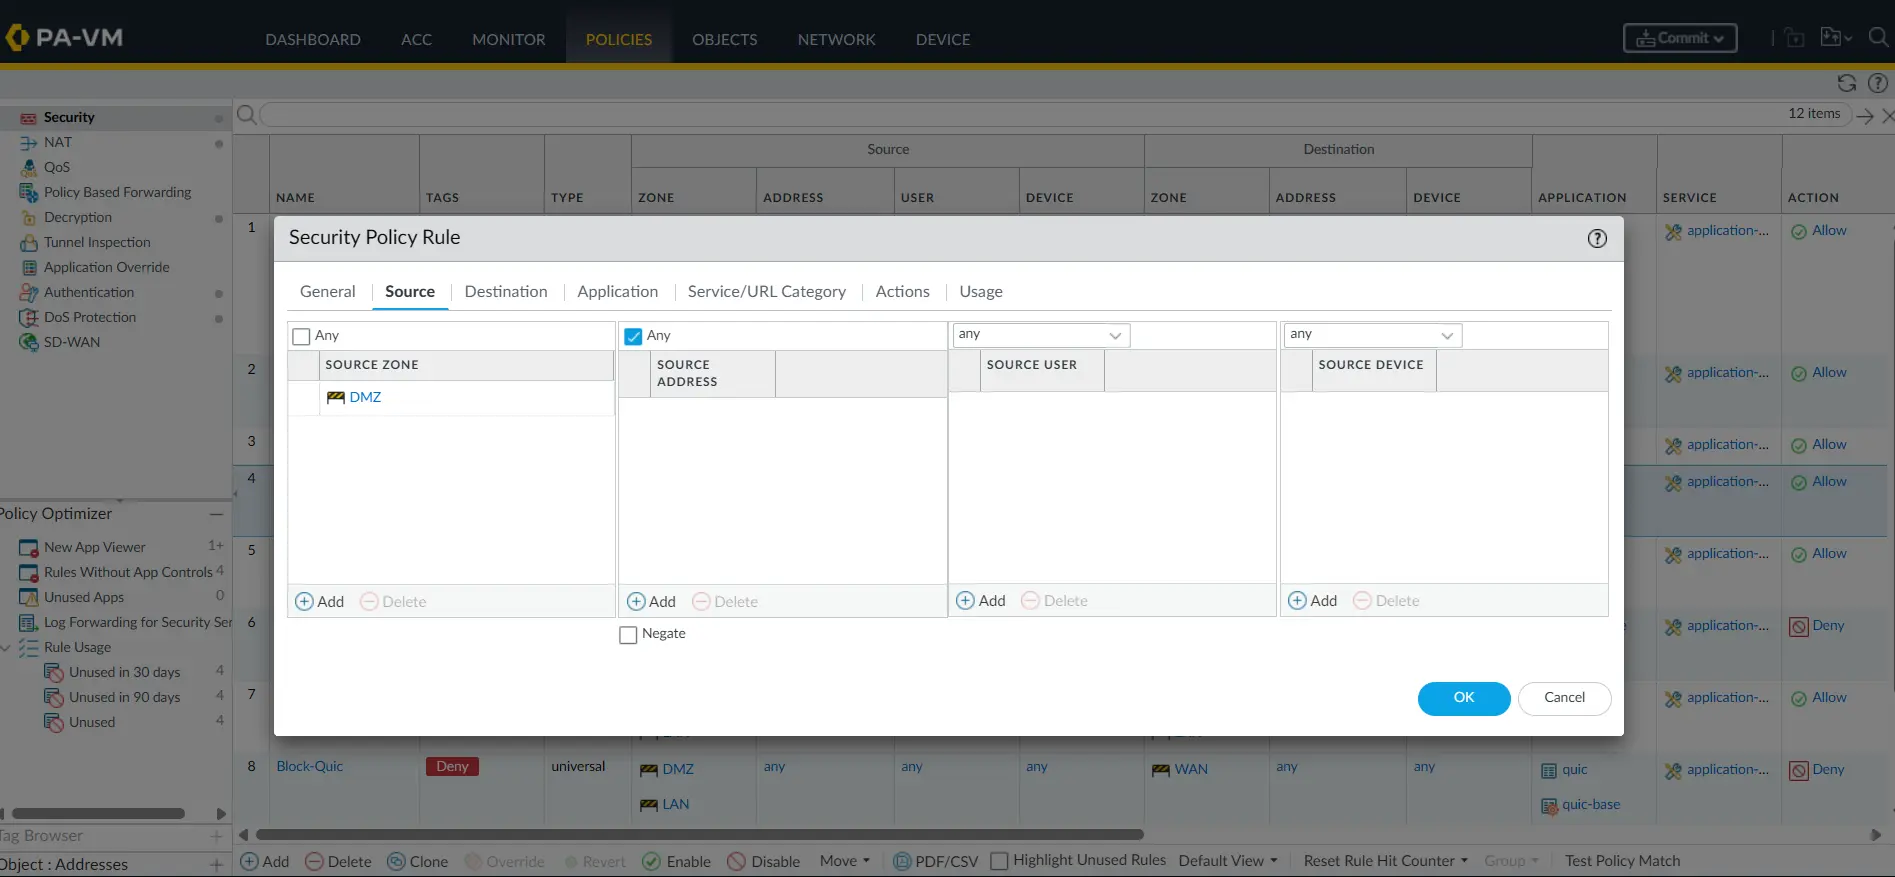
Open the Source tab.
For our first example:
Source Zone: DMZ
Source Address: any
The source zone is determined by the interface/zone where the traffic enters the firewall.
In our lab, PC-1 is:
172.20.1.5and its gateway is:
172.20.1.254The gateway interface belongs to the DMZ zone.
So when PC-1 sends traffic through PA-1, the firewall sees the traffic coming from the DMZ zone.
This is why the correct zone must be selected in the policy.
Step 3: Configure the Destination Zone
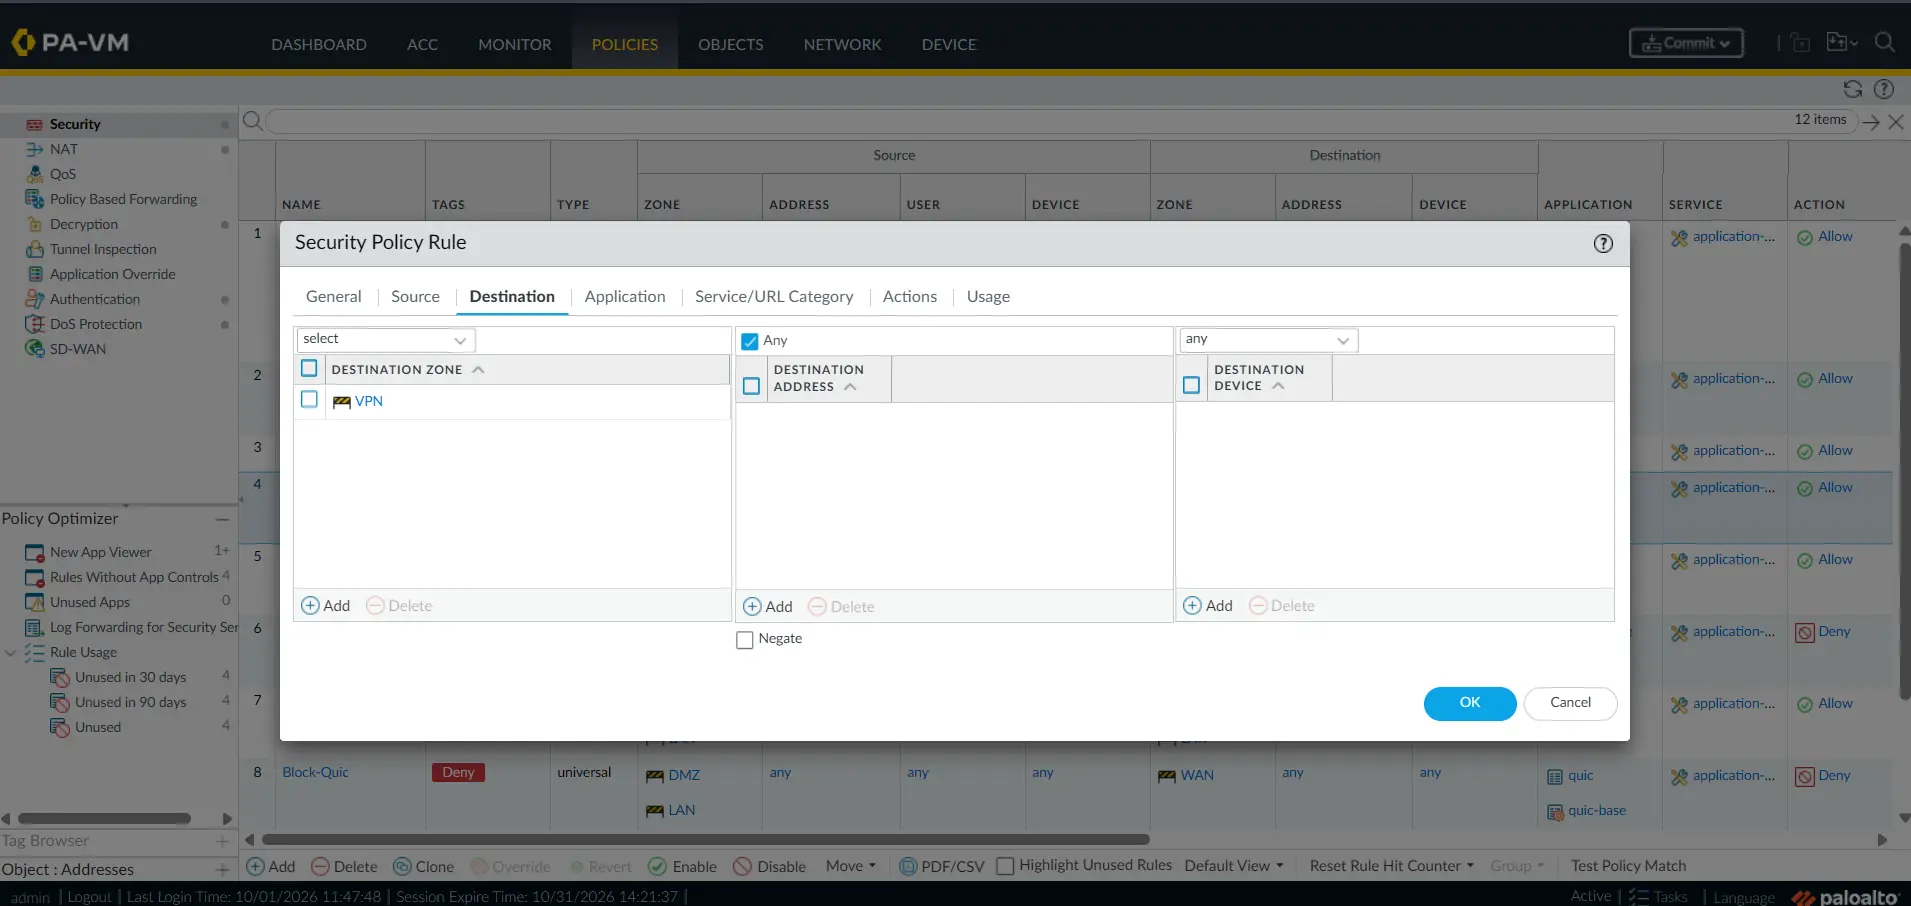
Now open the Destination tab.
For our VPN example:
Destination Zone: VPN
Destination Address: any
The destination zone is important because the packet is being routed toward the tunnel.2 interface, which belongs to the VPN zone in our lab.
The policy therefore becomes:
DMZ → VPNNotice that we’re not simply saying:
172.20.1.0/24 → 172.20.10.0/24We’re also telling the firewall which security zones the traffic is moving between.
Palo Alto Security Policies use source and destination zones as important matching criteria. (Palo Alto Networks TechDocs)
Step 4: Add the Destination Network
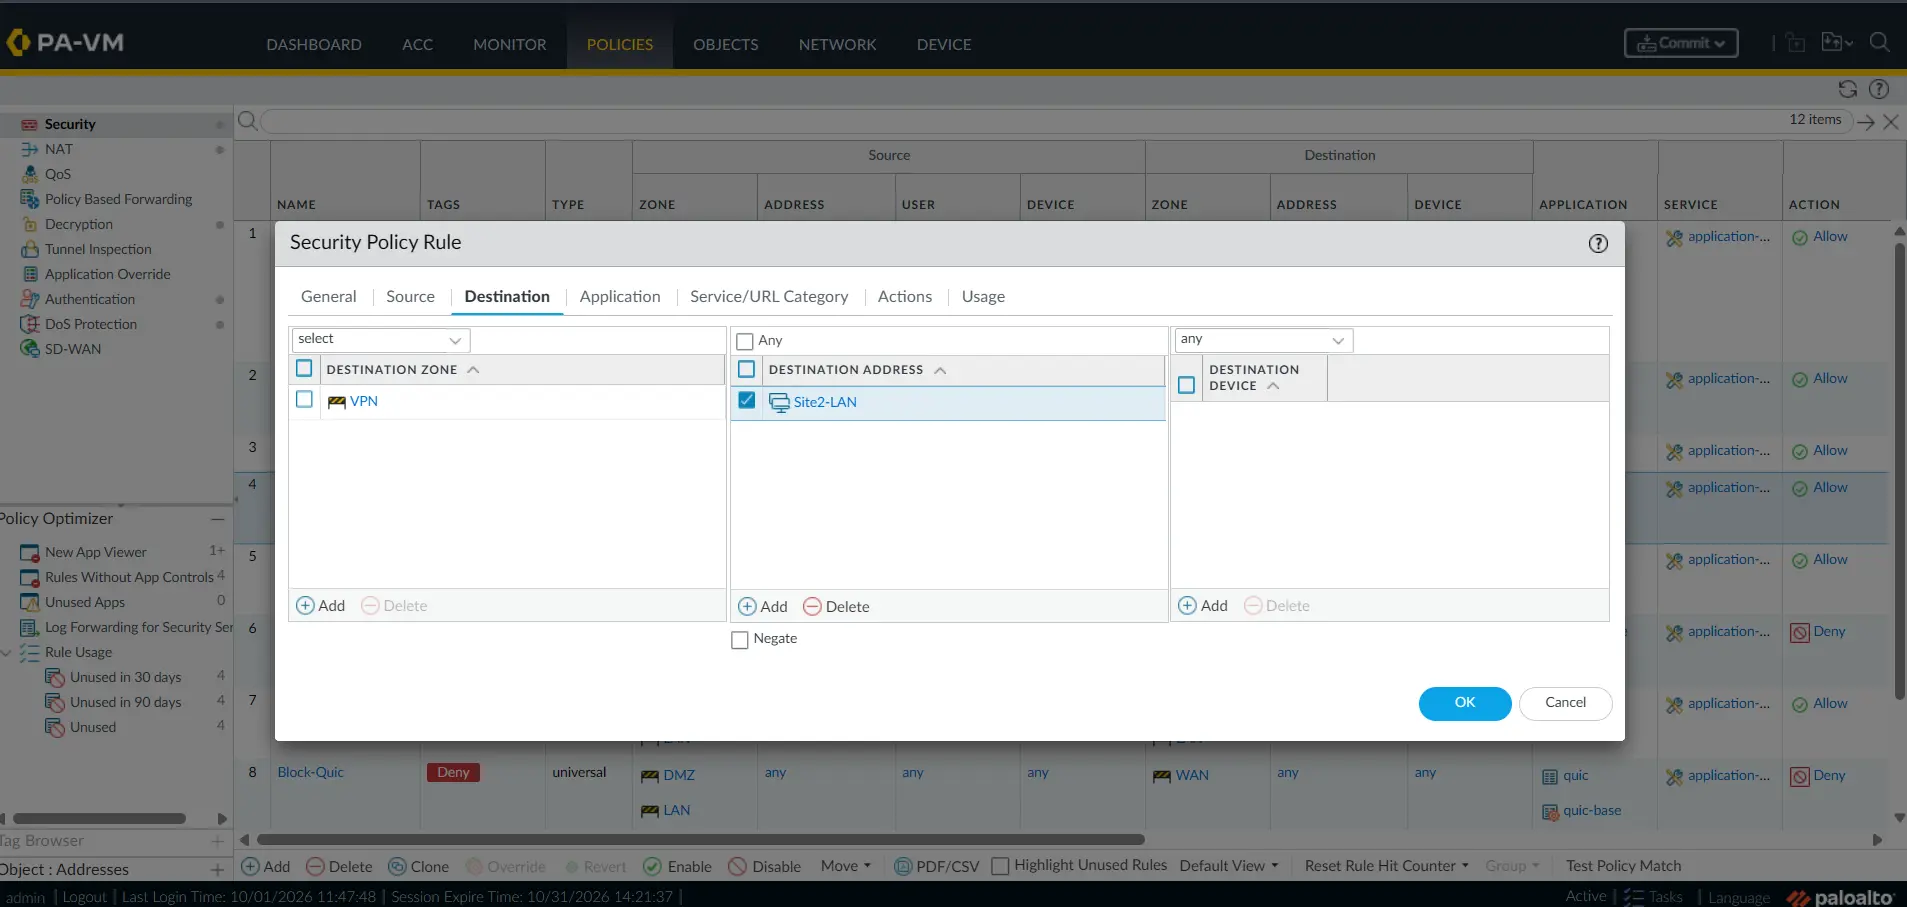
For testing, you could leave the destination address as any.
But let’s make the rule more specific.
Our remote network is:
172.20.10.0/24Create an address object such as:
Name: Site2-LAN
IP Netmask: 172.20.10.0/24
Then use:
Destination Address: Site2-LANThis is much better than allowing the DMZ to reach every network accessible through the VPN.
Palo Alto recommends using specific destination addresses or address objects where possible, particularly for infrastructure services and sensitive resources.
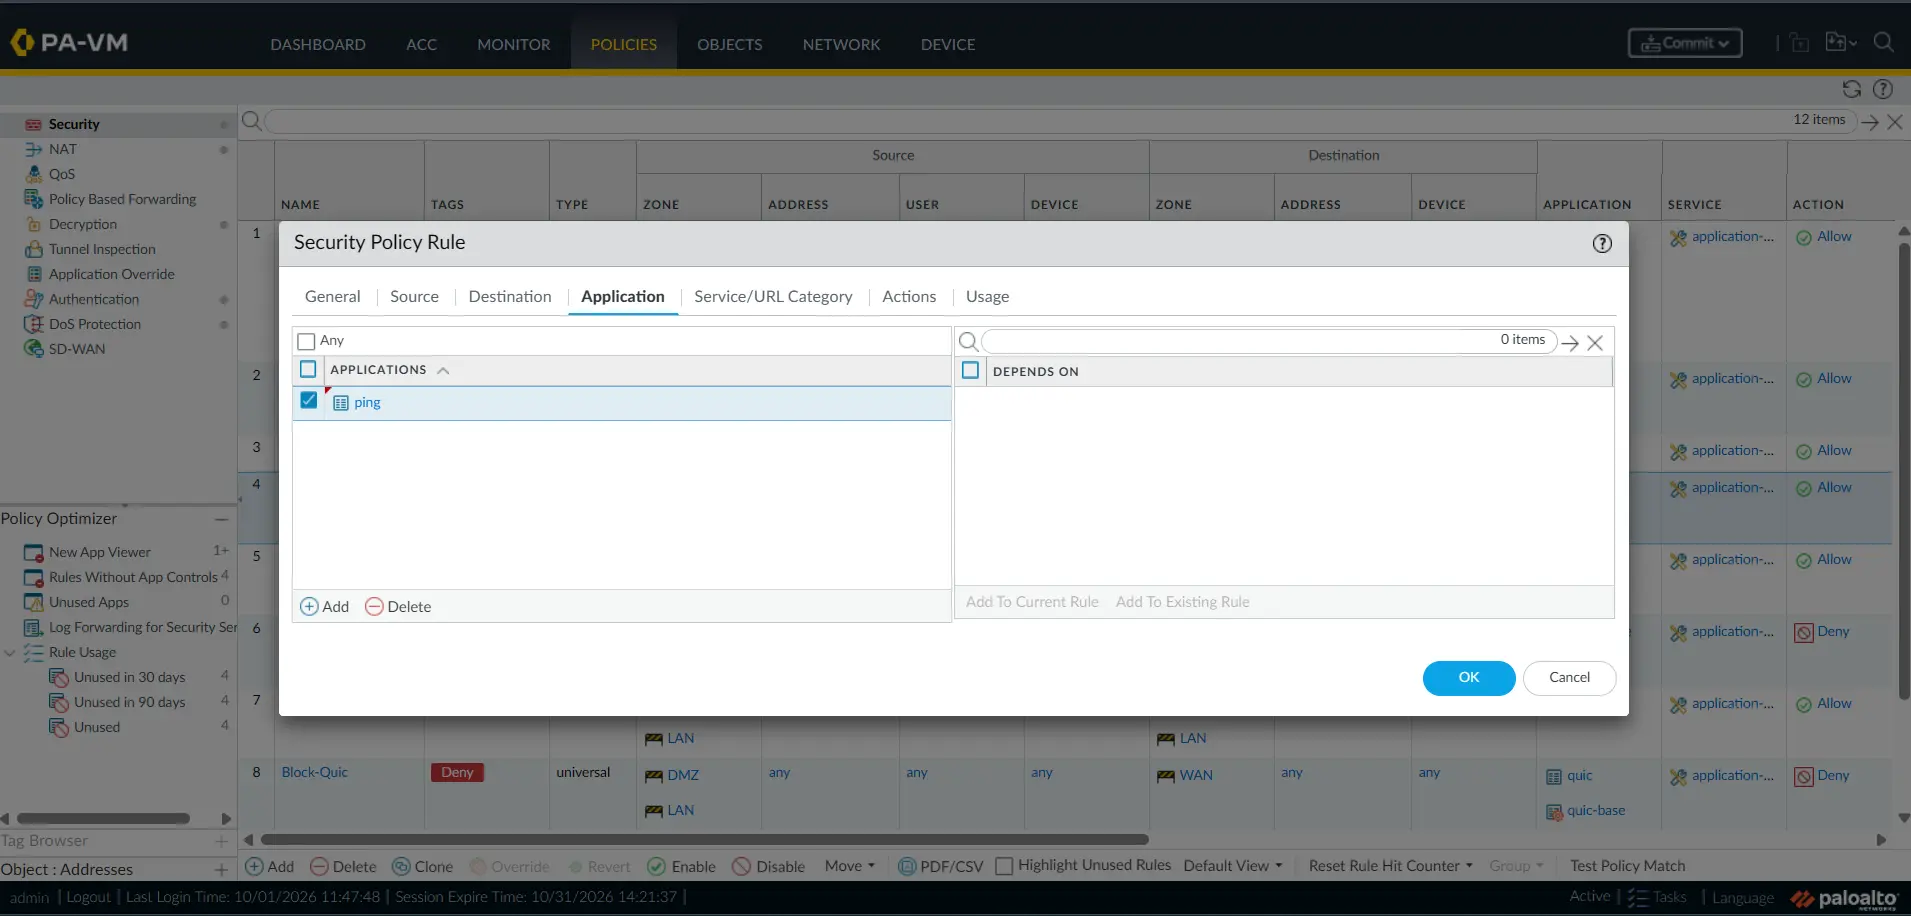
Step 5: Select the Application
Now we get to one of the most important parts of a Palo Alto Security Policy.
Open the Application section.
For our first test, select:
pingThe rule now says:
Source:
DMZ

Destination:
Site2-LAN

Application:
ping

Action:
Allow
This is different from a traditional firewall rule such as:
Source: 172.20.1.0/24
Destination: 172.20.10.0/24
Protocol: ICMP
Allow
Palo Alto uses App-ID to identify applications and allows policies to be based on application identity rather than relying only on ports.
Step 6: What About the Service?
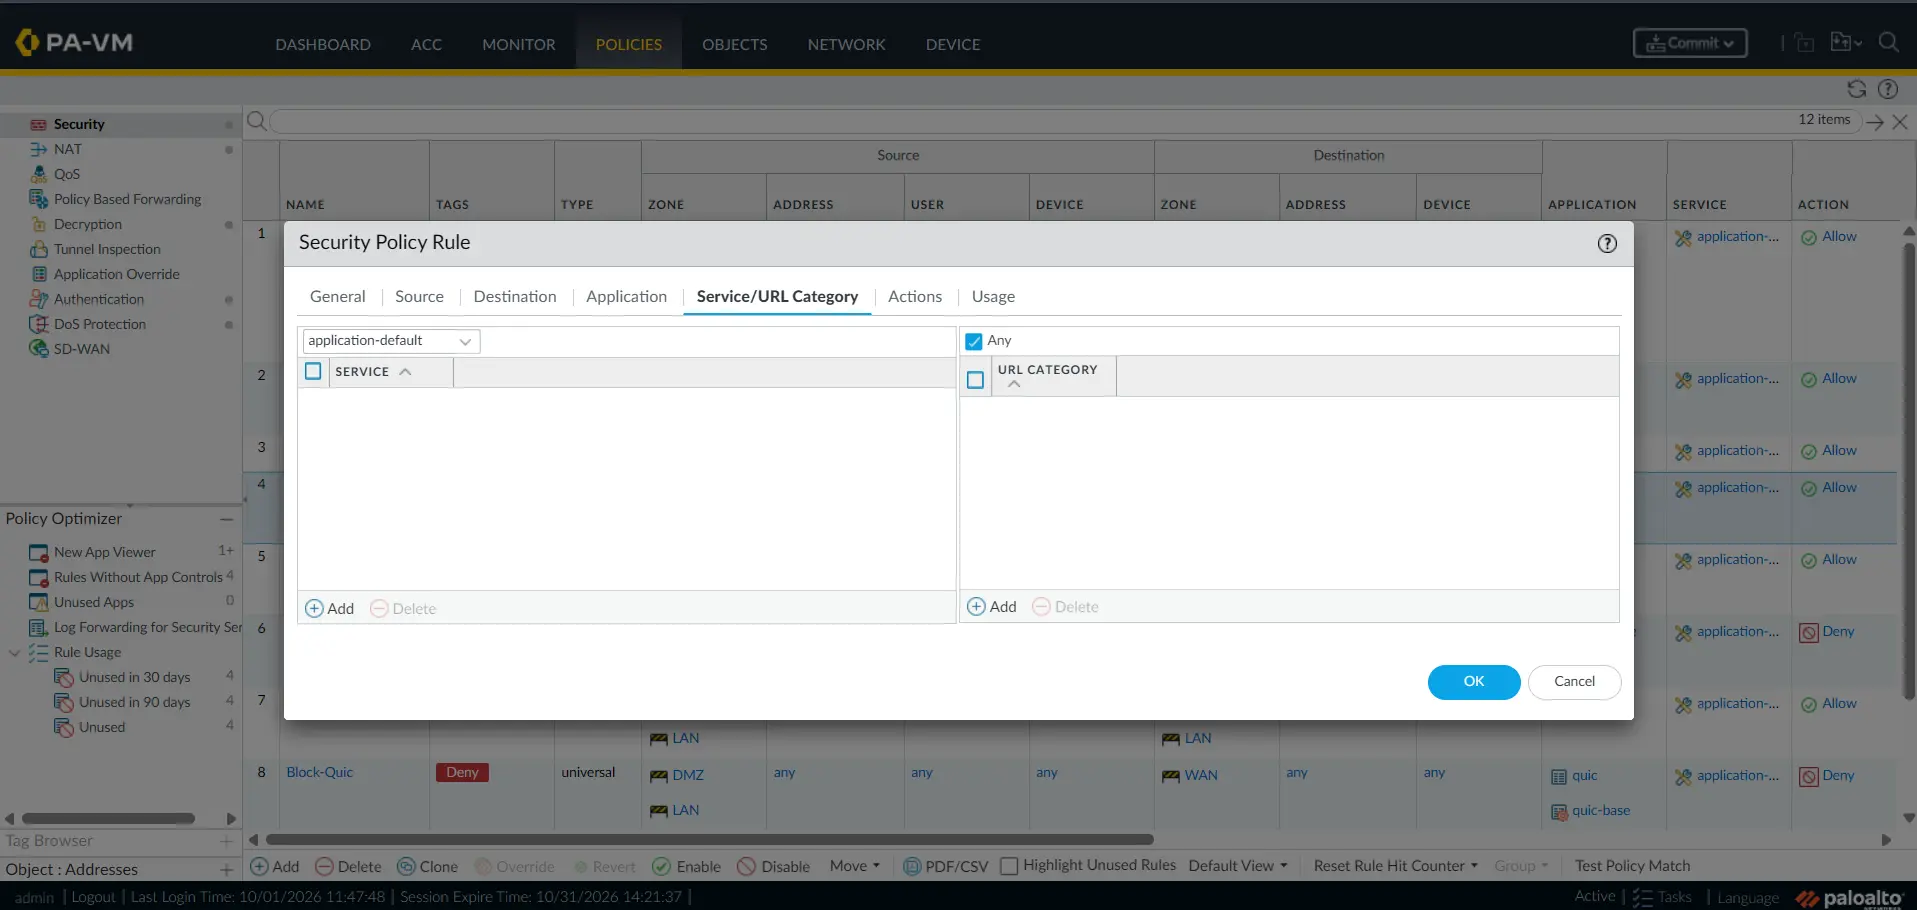
For the rule, set:
Service: application-defaultThis is an important Palo Alto concept.
application-default tells the firewall to allow the selected application only on its standard ports/protocols as defined by Palo Alto’s application signatures.
Palo Alto recommends application-based rules with application-default unless you have a specific reason to restrict the application to a different port range.
For example, if you create:
Application: ssl
Service: application-default
the firewall doesn’t simply allow every TCP port.
It uses the application’s expected service behavior.
Step 7: Configure the Action
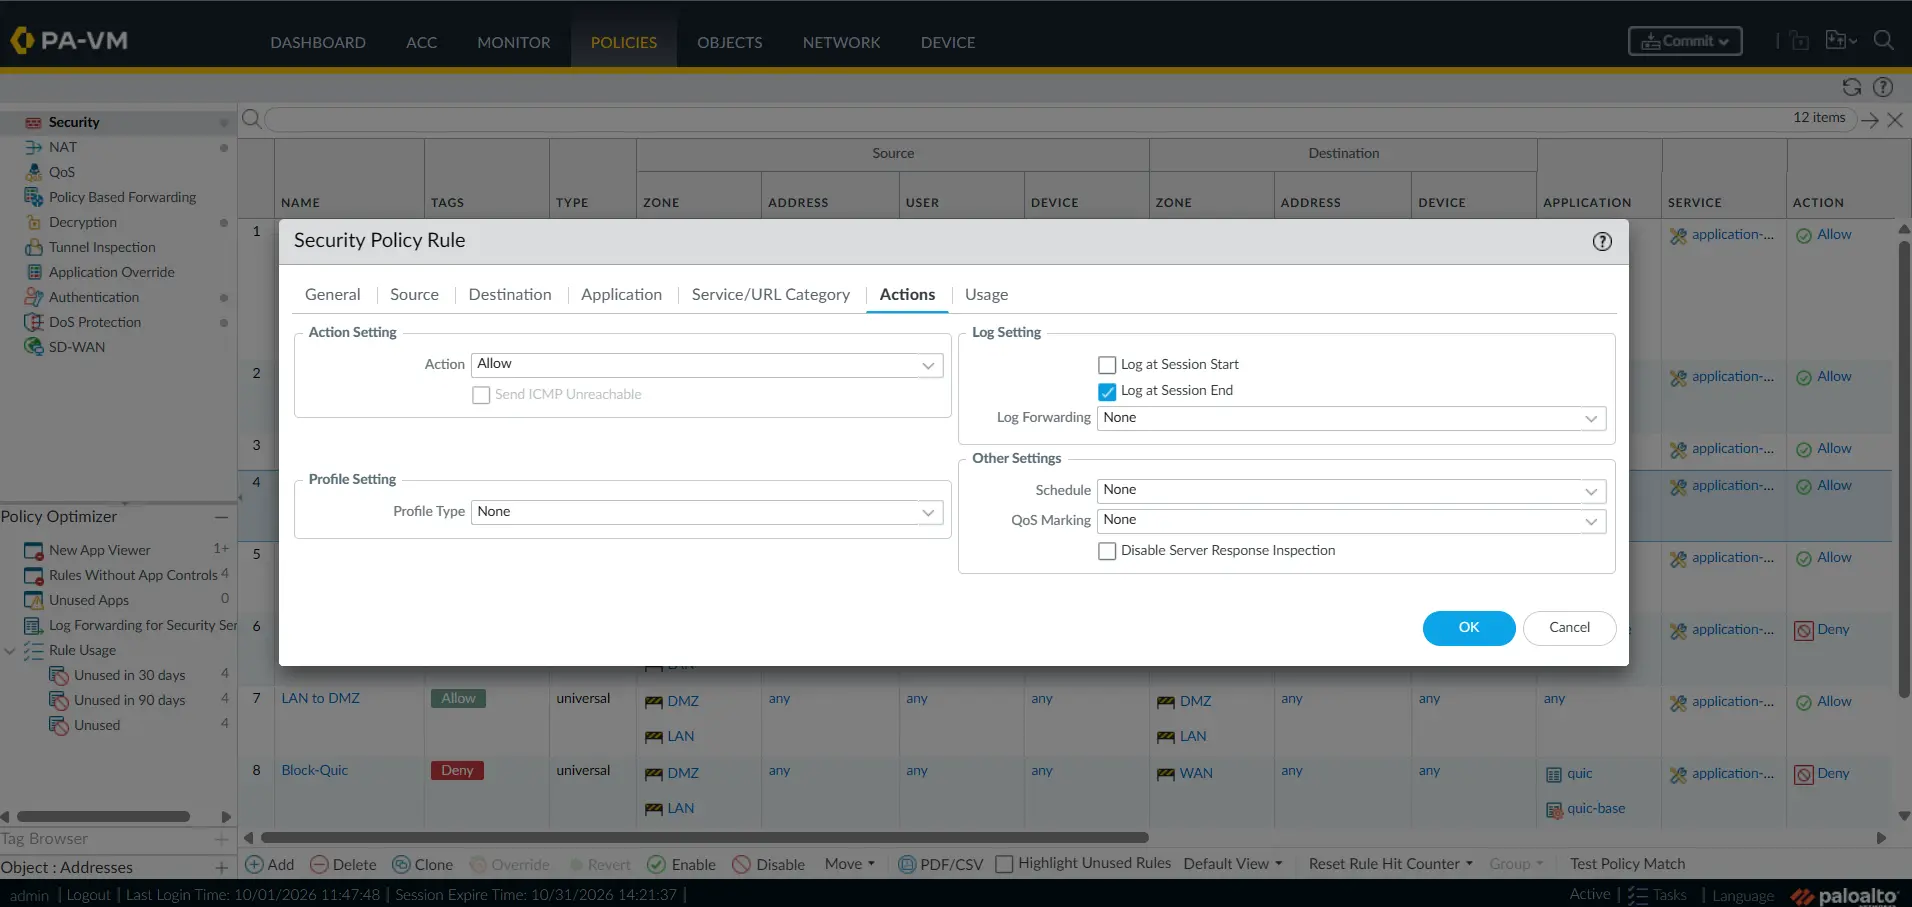
Go to the Actions tab.
For this lab rule:
Action: AllowYou can also attach Security Profiles to an allow rule.
For example:
- Antivirus
- Anti-Spyware
- Vulnerability Protection
- URL Filtering
- File Blocking
- WildFire
The exact profiles depend on your security requirements and licensed features.
For a simple lab demonstration, you can initially focus on the policy match and traffic flow.
Palo Alto’s basic policy guidance also recommends attaching appropriate Security Profiles to allowed traffic in production environments.
Step 8: Enable Logging
For troubleshooting, logging is extremely useful.
Enable:
Log at Session EndThen, after testing the traffic, go to:
Monitor → Traffic
You should be able to find the session and see information such as:
- Source IP
- Destination IP
- Application
- Service
- Action
- Rule
- Session end reason
Palo Alto notes that only traffic matching a Security Policy rule is logged in the traffic log, assuming logging is enabled for the rule.
Step 9: Commit the Policy
After creating the rule:
Commit → Commit
Remember that creating or editing the rule in the configuration doesn’t mean the new policy is immediately active in the running configuration until the change is committed.
After the commit completes, generate traffic from the client.
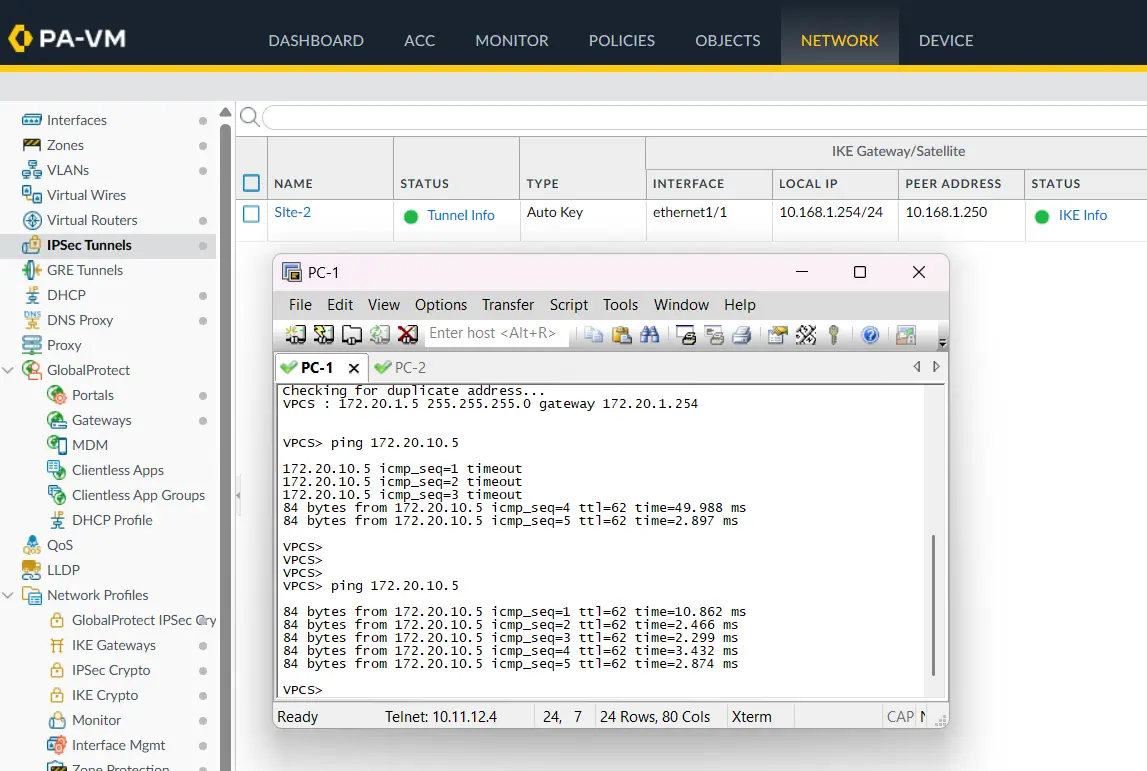
Step 10: Test From PC-1
From PC-1:
ping 172.20.10.5The traffic flow is:
PC-1
172.20.1.5
   ↓
PA-1 DMZ
   ↓
Security Policy
DMZ → VPN
   ↓
tunnel.2
   ↓
IPsec VPN
   ↓
PA-2
   ↓
172.20.10.5
If everything is configured correctly, the ping should succeed.
Then check:
Monitor → Traffic
Find the session and confirm that the expected Security Policy was matched.

What Happens If the Rule Doesn’t Match?
This is where Security Policy troubleshooting becomes interesting.
Suppose the ping fails.
Don’t immediately modify the rule.
Ask:
Is the source zone correct?
Is the destination zone correct?
Is the destination address correct?
Is the application identified correctly?
Is another rule above this one matching first?
Is the traffic actually reaching this firewall?
You can use the Security Policy Match tool to test which rule would match a particular flow.
Go to:
Device → Troubleshooting → Security Policy Match
Then provide information such as:
Source IP:       172.20.1.5
Destination IP:  172.20.10.5
Protocol:        ICMP
Application:     ping
Palo Alto provides Security Policy Match specifically to determine which Security Policy applies to a traffic flow.
Rule Order Matters
Let’s create another example.
Suppose we have:
Rule 1
Name: Block-DMZ-to-VPN
Source: DMZ
Destination: VPN
Action: Deny
and below it:
Rule 2
Name: Allow-DMZ-to-Site2
Source: DMZ
Destination: Site2-LAN
Application: ping
Action: Allow
The second rule will not help if the traffic already matches the first rule.
The firewall evaluates the rulebase from top to bottom and applies the first matching rule.
This is one of the first things I would check when a rule appears correct but traffic is still being denied.
A more specific rule should generally be placed above a broader rule when both could match the same traffic.
Practical Example: DMZ and LAN to VPN
This is similar to the policy structure used in our IPsec lab.
On Site-1, we have:
Local Zones:
DMZ
LAN

Remote Zone:
VPN
Our lab policies allow:
DMZ → VPN
LAN → VPN

VPN → DMZ
VPN → LAN
For example:
| Rule | Source Zone | Destination Zone | Purpose |
|---|---|---|---|
| Local-to-VPN | DMZ, LAN | VPN | Allow local networks toward VPN |
| VPN-to-Local | VPN | DMZ, LAN | Allow remote VPN traffic back to local networks |
For the lab, these rules can be broad enough to verify connectivity.
In production, I would normally make them more specific.
For example:
Source Zone: DMZ
Source: 172.20.1.0/24

Destination Zone: VPN
Destination: 172.20.10.0/24

Application: ping
Service: application-default

Action: Allow
Then add only the applications actually required by the business.
A Common Mistake: Using Any Everywhere
During initial testing, it’s tempting to configure:
Source Zone: any
Source Address: any
Destination Zone: any
Destination Address: any
Application: any
Service: any
Action: Allow
It may make connectivity work.
But that’s not a good final security policy.
You have effectively removed most of the firewall’s access-control decisions.
A better approach is to start with the actual requirement:
Who?
 ↓
From where?
 ↓
Going where?
 ↓
Which application?
 ↓
Which service?
 ↓
What security inspection is required?
Then build the rule around those requirements.
Security Policy vs NAT Policy
Another common source of confusion is mixing up Security Policy and NAT Policy.
They perform different jobs.
Security Policy
Answers:
Should this traffic be allowed or blocked?
NAT Policy
Answers:
Should the source or destination address be translated?
For example:
PC-1
172.20.1.5
     ↓
Security Policy
     ↓
Allow
     ↓
NAT Policy
     ↓
No NAT for VPN traffic
     ↓
IPsec tunnel
A traffic session can therefore be allowed by Security Policy and still fail because of incorrect NAT.
This is especially important in site-to-site VPN environments.
Security Policy Troubleshooting Checklist
When traffic isn’t working, check these in order:
1. Is the interface up?
Verify that the traffic is entering through the expected interface.
2. Is the source zone correct?
For our lab:
172.20.1.5 → DMZ3. Is the destination zone correct?
For VPN traffic:
VPN4. Is the destination address correct?
For example:
172.20.10.0/245. Is the application correct?
Check what App-ID identifies.
6. Is the service correct?
Usually start with:
application-default7. Is another rule matching first?
Check the rule order and Security Policy Match.
8. Is the session visible in Traffic logs?
If not, determine whether the traffic is reaching the firewall and whether logging is enabled.
9. Is NAT changing the traffic?
Check the applicable NAT rule.
10. Is the return traffic working?
Remember that successful forward traffic doesn’t automatically prove the complete communication path is correct.
Best Practices for Palo Alto Security Policies
A few practices will make a large rulebase much easier to manage.
Use meaningful rule names
Prefer:
DMZ-to-Site2-LAN-Ping
Users-to-Internet-Web
VPN-to-DMZ-RDP
instead of:
Rule1
Test
Allow
Use specific addresses
If a user only needs access to one server, don’t give access to the entire subnet.
Prefer applications over broad port rules
Use App-ID where appropriate and keep the service at application-default unless there is a specific reason to do otherwise.
Keep specific rules above broad rules
Remember the first-match behavior.
Enable useful logging
Without logs, troubleshooting becomes much harder.
Review unused rules
Over time, firewall rulebases accumulate old policies. Regular review helps identify rules that are no longer needed.
Document why a rule exists
A description such as:
Allows application server access to Site-2 database
for Project ABC
is much more useful six months later than a rule with no description.
Final Thoughts
A Palo Alto Security Policy is more than an allow/deny rule.
It is where you define who can communicate, where they can communicate, which applications they can use, and what security controls should be applied to that traffic.
The part that usually takes time to understand is not creating the rule. It’s understanding why a particular session matched or didn’t match the rule.
Once you get comfortable with zones, addresses, App-ID, services, rule order, logs, and Security Policy Match, troubleshooting becomes much more straightforward.
And when you combine that understanding with routing and NAT, you can trace a packet through the firewall instead of simply changing rules until something starts working.

Cybersecurity blogger with a focus on firewalls, network security, and tech trends making security simple for everyone, from IT pros to curious minds.