The VPN tunnel shows UP, but users still cannot access the remote network.
Or maybe the tunnel is completely down and you are not sure whether the problem is with IKE, IPsec, routing, NAT, or the security policy.
This is where a structured troubleshooting approach helps. Instead of changing multiple settings at once, troubleshoot the VPN in the same order that the traffic and negotiation actually happen.
In this article, we will troubleshoot common Palo Alto site-to-site IPsec VPN problems, starting with IKE Phase 1 and moving through Phase 2, routing, security policies, NAT, and actual traffic flow.
Related series: This article continues our Site-to-Site IPsec VPN series. If you want to understand the concepts before troubleshooting, see IKE Phase 1, IPsec Phase 2, routing, NAT and security policies, and our practical Palo Alto IPsec VPN configuration.
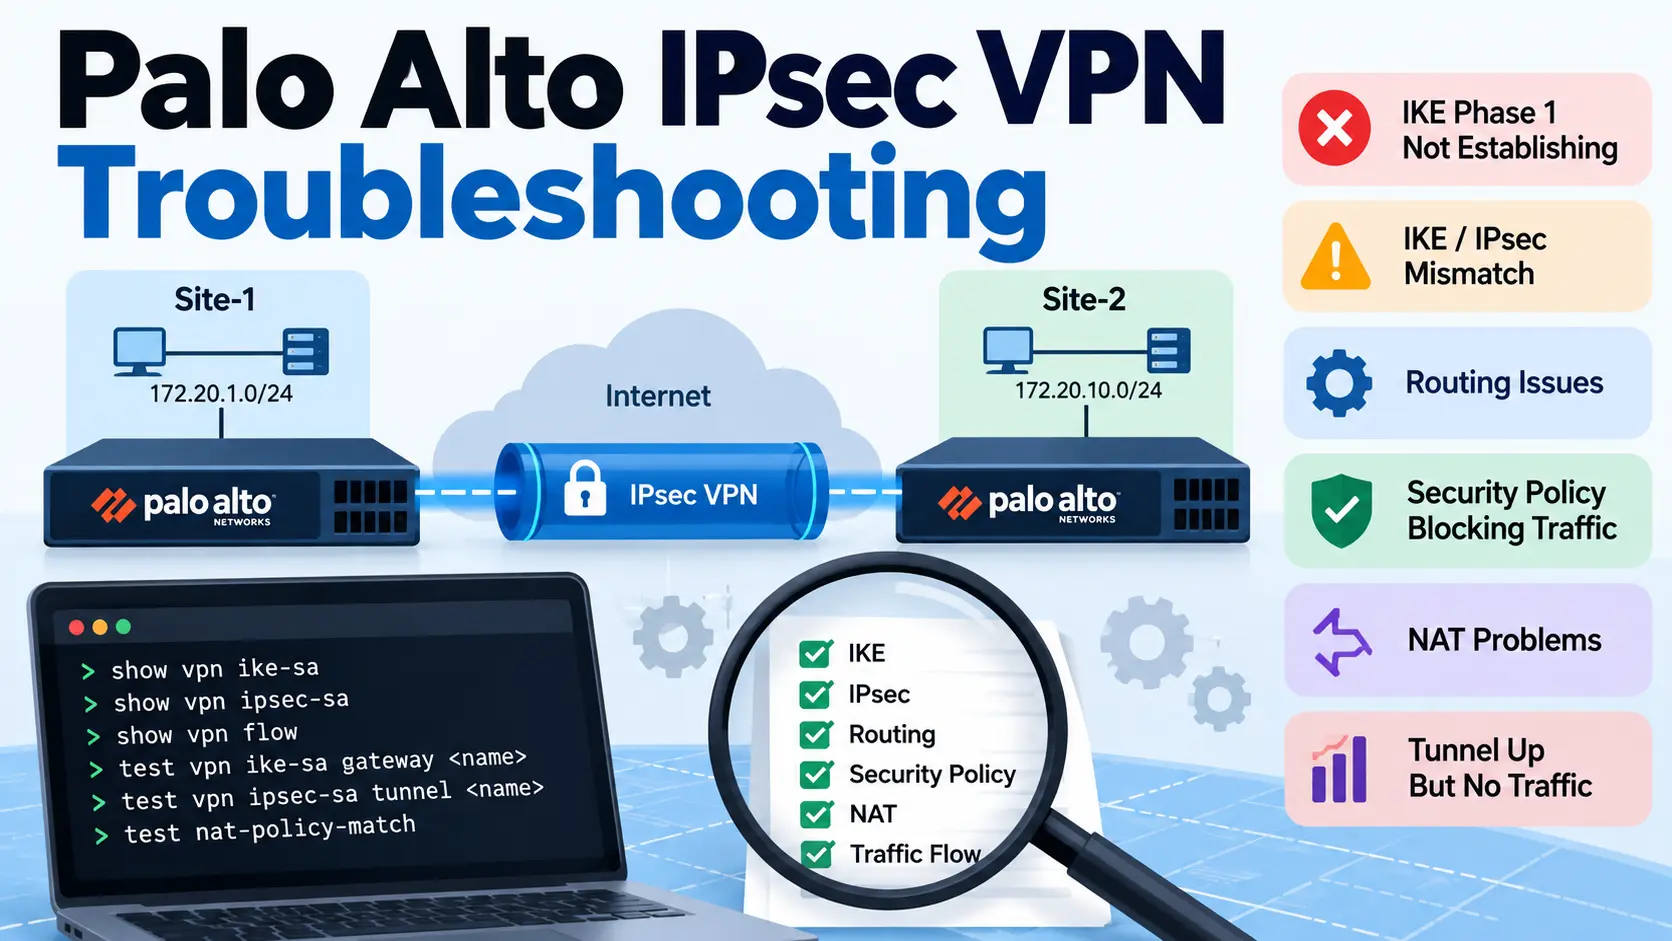
How to Troubleshoot an IPsec VPN
A useful way to troubleshoot a site-to-site VPN is to break it into layers:
Peer Reachability
       ↓
IKE Phase 1
       ↓
IPsec Phase 2
       ↓
Routing
       ↓
Security Policy
       ↓
NAT
       ↓
Actual Traffic
Don’t start by changing the security policy if IKE Phase 1 isn’t established.
Likewise, if the tunnel is UP but traffic is not passing, there is little value in repeatedly checking the pre-shared key.
Start at the first point where the expected behavior stops.
1. First Check: Is the VPN Peer Reachable?
Before troubleshooting IPsec itself, verify basic connectivity between the two VPN endpoints.
For example, assume:
Site-1 Palo Alto WAN: 10.168.1.254
Site-2 Palo Alto WAN: 10.168.1.250
From Site-1, verify that the peer can be reached.
If the peer isn’t reachable, IKE negotiation cannot complete.
Check:
- WAN interface status
- IP address and subnet mask
- Default route or appropriate route
- Upstream connectivity
- Remote peer IP
- Any intermediate firewall or ACL
- NAT between the VPN peers, if applicable
Palo Alto also recommends checking the peer IP and routing when IKE Phase 1 negotiation fails. (Palo Alto Networks TechDocs)
What if the peer is reachable but IKE is still down?
Then move to IKE Phase 1.
2. IKE Phase 1 Is Not Establishing
IKE Phase 1 creates the IKE Security Association and establishes the parameters used to securely negotiate the VPN.
On Palo Alto, you can initiate and check the IKE SA from the CLI:
test vpn ike-sa gateway <gateway_name>Then:
show vpn ike-sa gateway <gateway_name>Palo Alto documents these commands specifically for initiating and verifying IKE Phase 1.
If the expected IKE SA does not appear, check the following.
Check the IKE Gateway
Make sure both sides have the correct:
- Peer IP address
- Local interface/address
- IKE version
- Authentication method
- Pre-shared key or certificate
- IKE Crypto Profile
A mismatch in any of these can prevent Phase 1 from completing.
Common example
Site-1:
Peer IP: 10.168.1.250
IKE Version: IKEv2
Site-2:
Peer IP: 10.168.1.254
IKE Version: IKEv2
If Site-1 accidentally points to 10.168.1.251, it is trying to establish the VPN with the wrong peer.
The configuration can look perfectly valid locally while the tunnel never comes up.
3. IKE Crypto Profile Mismatch
This is another common reason for Phase 1 failure.
For example, Site-1 might use:
Encryption: AES-256-CBC
Authentication: SHA-256
DH Group: 14
while Site-2 uses:
Encryption: AES-128-CBC
Authentication: SHA-256
DH Group: 14
The peers need a compatible proposal.
Check the IKE Crypto Profile on both firewalls and compare:
- Encryption algorithm
- Authentication/hash algorithm
- DH group
- Lifetime
Don’t assume that two profiles with similar names are identical. Open the profile and compare the actual settings.
Palo Alto’s VPN troubleshooting documentation lists “no proposal chosen” among the VPN negotiation errors that can indicate a proposal mismatch.
If you are using a pre-shared key, verify it on both sides.
For example:
Site-1: MyVPNKey123
Site-2: MyVPNKey123
Even a small difference will prevent authentication.
The important point is that the pre-shared key is not part of the IPsec encryption profile. It is used for peer authentication during IKE negotiation.
So if the peer is reachable and the IKE proposal looks correct but Phase 1 still fails, authentication should be one of the things you check.
5. IKE Phase 1 Is UP, But Phase 2 Is DOWN
This is a different problem.
If you have an IKE SA but no IPsec SA, Phase 1 has succeeded and the problem is further down the negotiation.
Test Phase 2:
test vpn ipsec-sa tunnel <tunnel_name>Then check:
show vpn ipsec-sa tunnel <tunnel_name>Palo Alto documents these commands for initiating and verifying the IPsec SA.
Now compare the IPsec Crypto Profile on both sides.
Check:
- IPsec protocol
- Encryption
- Authentication
- PFS/DH group
- Lifetime
For example:
Protocol: ESP
Encryption: AES-256-CBC
Authentication: SHA-256
PFS: DH Group 14
If one side has PFS enabled and the other side does not, the Phase 2 negotiation may fail.
6. Check Proxy IDs and Traffic Selectors
This one causes confusion, especially when connecting Palo Alto to another firewall vendor.
In a route-based Palo Alto VPN, Proxy IDs may not be required in the same way they are for a policy-based VPN. But when the peer requires specific traffic selectors, the configuration needs to match what the remote device expects.
For example:
Site-1:
Local: 172.20.1.0/24
Remote: 172.20.10.0/24
The remote firewall needs the corresponding opposite networks.
Palo Alto notes that when Proxy IDs are used, the configurations on the two VPN peers should mirror each other in opposite directions.
So if Phase 1 is UP but Phase 2 isn’t, check the traffic selectors/Proxy IDs before changing unrelated settings.
7. The Tunnel Is UP, But Traffic Doesn’t Pass
This is probably the most confusing VPN problem.
You look at the firewall and see:
IKE SA: UP
IPsec SA: UP
Tunnel: UP
But:
PC-1 → PC-2 = FAILA tunnel being UP does not automatically mean that your application traffic is allowed.
Now troubleshoot the data path.
For example:
PC-1
172.20.1.5
   ↓
PA-1 DMZ
172.20.1.254
   ↓
tunnel.2
   ↓
PA-2
   ↓
172.20.10.0/24
   ↓
PC-2
172.20.10.5
There are several places where this packet can fail.
8. Check the Route to the Remote Network
The firewall needs to know that the remote network should be sent through the VPN tunnel.
For example, on Site-1:
Destination: 172.20.10.0/24
Next Hop: tunnel.2
And on Site-2:
Destination: 172.20.1.0/24
Next Hop: tunnel.2
If the route is missing, the firewall may send the packet toward the default route instead of the VPN.
This is especially important with route-based VPNs because the tunnel interface participates in routing.
Think about the packet from both directions
For:
172.20.1.5 → 172.20.10.5Site-1 needs a route to 172.20.10.0/24.
For the reply:
172.20.10.5 → 172.20.1.5Site-2 needs a route to 172.20.1.0/24.
A missing return route can make the VPN look like it is working when the actual communication fails.
9. Check the Security Policy
The next question is:
Is the firewall allowing the traffic?
For example, in our lab, the security policies allow traffic between the local networks and the VPN zone:
DMZ → VPN
LAN → VPN
VPN → DMZ
VPN → LAN
The exact policy design depends on your environment.
For testing, you might temporarily have broad rules, but production rules should normally be restricted to the required source, destination, application, and service.
For example:
Source Zone: DMZ
Source: 172.20.1.0/24

Destination Zone: VPN
Destination: 172.20.10.0/24

Action: Allow
If the packet reaches the firewall but matches a deny rule, the VPN itself can remain UP while the application traffic is blocked.
This is why checking the tunnel status alone is not enough.
10. Check NAT
NAT is another common source of VPN problems.
Suppose your Internet SNAT rule translates:
172.20.1.5 → Public/WAN IPBut the traffic is actually supposed to travel through the VPN as:
172.20.1.5 → 172.20.10.5You don’t want your VPN traffic accidentally matching the Internet NAT rule.
A typical approach is to make sure the VPN traffic is handled by the appropriate NAT logic before a general Internet SNAT rule.
Check:
- Source zone
- Destination zone
- Source address
- Destination address
- NAT rule order
- Translated source address
Palo Alto provides test nat-policy-match for testing which NAT policy matches a given flow.
The important question is simple:
Is this packet being translated when it shouldn’t be?
11. Check VPN Traffic Counters
Once the tunnel is established, generate some traffic across it.
Then check:
show vpn flowPalo Alto documents this command for viewing VPN traffic flow and IPsec counters.
You want to see whether the counters change when you generate traffic.
For example:
PC-1 → ping 172.20.10.5Then check the VPN counters again.
If traffic is being encapsulated, the counters should reflect the VPN traffic.
If the tunnel is UP but the counters remain unchanged, investigate the traffic path before assuming the encryption itself is broken.
12. Use the Firewall Logs
If the tunnel is UP but the application doesn’t work, don’t guess.
Check the traffic logs.
Look for:
- Source IP
- Destination IP
- Source zone
- Destination zone
- Application
- Service
- Action
- Rule name
- Session end reason
For example, if you expected:
172.20.1.5 → 172.20.10.5but the traffic log shows the packet hitting an Internet policy, you have already found an important clue.
The problem may be routing, NAT, zone selection, or policy order rather than IPsec negotiation.
13. Use Packet Capture Carefully
Packet capture can help when normal logs aren’t enough.
A useful approach is to capture the traffic at the relevant stages and determine where the packet disappears.
For example:
Client
  ↓
Ingress interface
  ↓
Firewall processing
  ↓
Security policy
  ↓
Tunnel
  ↓
Encrypted WAN traffic
There is an important Palo Alto-specific detail here: a packet capture on a logical IPsec tunnel interface may not show the original inner packet at the transmit stage because the traffic has already been encrypted. Palo Alto recommends using encapsulation counters, the remote peer, or a capture on the physical egress interface when investigating this situation.
So don’t conclude that traffic isn’t leaving the firewall just because you don’t see the expected clear-text packet in a tunnel-interface transmit capture.
14. Check Tunnel Monitoring
A tunnel can have valid IKE and IPsec SAs but still have a path problem.
Tunnel monitoring can be used to verify reachability through the tunnel. Palo Alto explains that the tunnel interface is logical and therefore does not have a physical link state; tunnel monitoring can check reachability to a configured IP address and take configured action when the monitored destination becomes unreachable.
For IKEv2, there is also an IKE liveness check, which helps determine whether the peer is still available.
This matters in environments where the VPN remains technically established but the path behind the peer has failed.
15. Useful Palo Alto IPsec VPN CLI Commands
Here are some commands worth keeping handy during troubleshooting:
| Purpose | Command |
|---|---|
| Show IKE SAs | show vpn ike-sa |
| Show IPsec SAs | show vpn ipsec-sa |
| Show VPN flow/counters | show vpn flow |
| Show VPN gateways | show vpn gateway |
| Show IPsec tunnels | show vpn tunnel |
| Test IKE Phase 1 | test vpn ike-sa gateway <gateway> |
| Test IPsec Phase 2 | test vpn ipsec-sa tunnel <tunnel> |
| Test NAT policy match | test nat-policy-match |
These commands are documented in Palo Alto’s current CLI troubleshooting and networking references.
For deeper troubleshooting, Palo Alto also provides debug commands for IKE negotiation and packet capture. Use those carefully because debugging can generate significant diagnostic information.
A Practical Troubleshooting Workflow
When IKE/IPsec VPN traffic isn’t working, I would go through it in this order:
Step 1 — Check the WAN
Can the two VPN peers reach each other?Step 2 — Check IKE Phase 1
show vpn ike-saIf it isn’t established, check:
- Peer IP
- IKE version
- Authentication
- PSK/certificate
- IKE Crypto Profile
Step 3 — Check IPsec Phase 2
show vpn ipsec-saCheck:
- IPsec Crypto Profile
- ESP settings
- PFS/DH
- Traffic selectors/Proxy IDs
Step 4 — Check Routing
Ask:
Does the firewall have a route to the remote subnet?Then check the return route.
Step 5 — Check Security Policy
Ask:
Which security rule is matching the traffic?Step 6 — Check NAT
Ask:
Is the VPN traffic being translated?Step 7 — Generate Traffic
Use a known test:
ping <remote-host>Then check:
show vpn flowStep 8 — Check Logs
Look at the traffic logs and determine where the session is going.
Step 9 — Capture Packets
Only move to packet capture when the normal status, routing, policy, and NAT checks don’t explain the problem.
This order saves a lot of time because you are troubleshooting from the foundation upward instead of changing random settings.
Common Palo Alto IPsec VPN Problems at a Glance
| Problem | What to Check First |
|---|---|
| IKE Phase 1 DOWN | Peer IP, reachability, IKE settings, authentication |
| “No proposal chosen” | IKE Crypto Profile |
| Authentication failure | PSK/certificate configuration |
| IKE UP, IPsec DOWN | IPsec Crypto Profile, PFS, traffic selectors |
| Tunnel UP, no traffic | Routing, security policy, NAT |
| One-way traffic | Return route, security policy, NAT |
| VPN counters don’t increase | Routing, policy, NAT, session flow |
| Tunnel drops unexpectedly | Peer reachability, liveness/tunnel monitoring |
| Packet capture looks empty | Capture point and IPsec encryption behavior |
| Remote network unreachable | Static/dynamic route and tunnel interface |
Final Thoughts
Troubleshooting Palo Alto IPsec VPN becomes much easier when you stop treating the VPN as one single component.
There are several separate things happening:
IKE
 ↓
IPsec
 ↓
Routing
 ↓
Security Policy
 ↓
NAT
 ↓
Traffic
A tunnel being UP only tells you that the VPN negotiation and Security Associations are established. It does not prove that the required application traffic is being routed, permitted, translated correctly, and successfully returned.
The best approach is to find the first point where the expected behavior stops and troubleshoot that layer before moving further.
That is much more reliable than repeatedly changing VPN settings and hoping the tunnel starts working.

Cybersecurity blogger with a focus on firewalls, network security, and tech trends making security simple for everyone, from IT pros to curious minds.